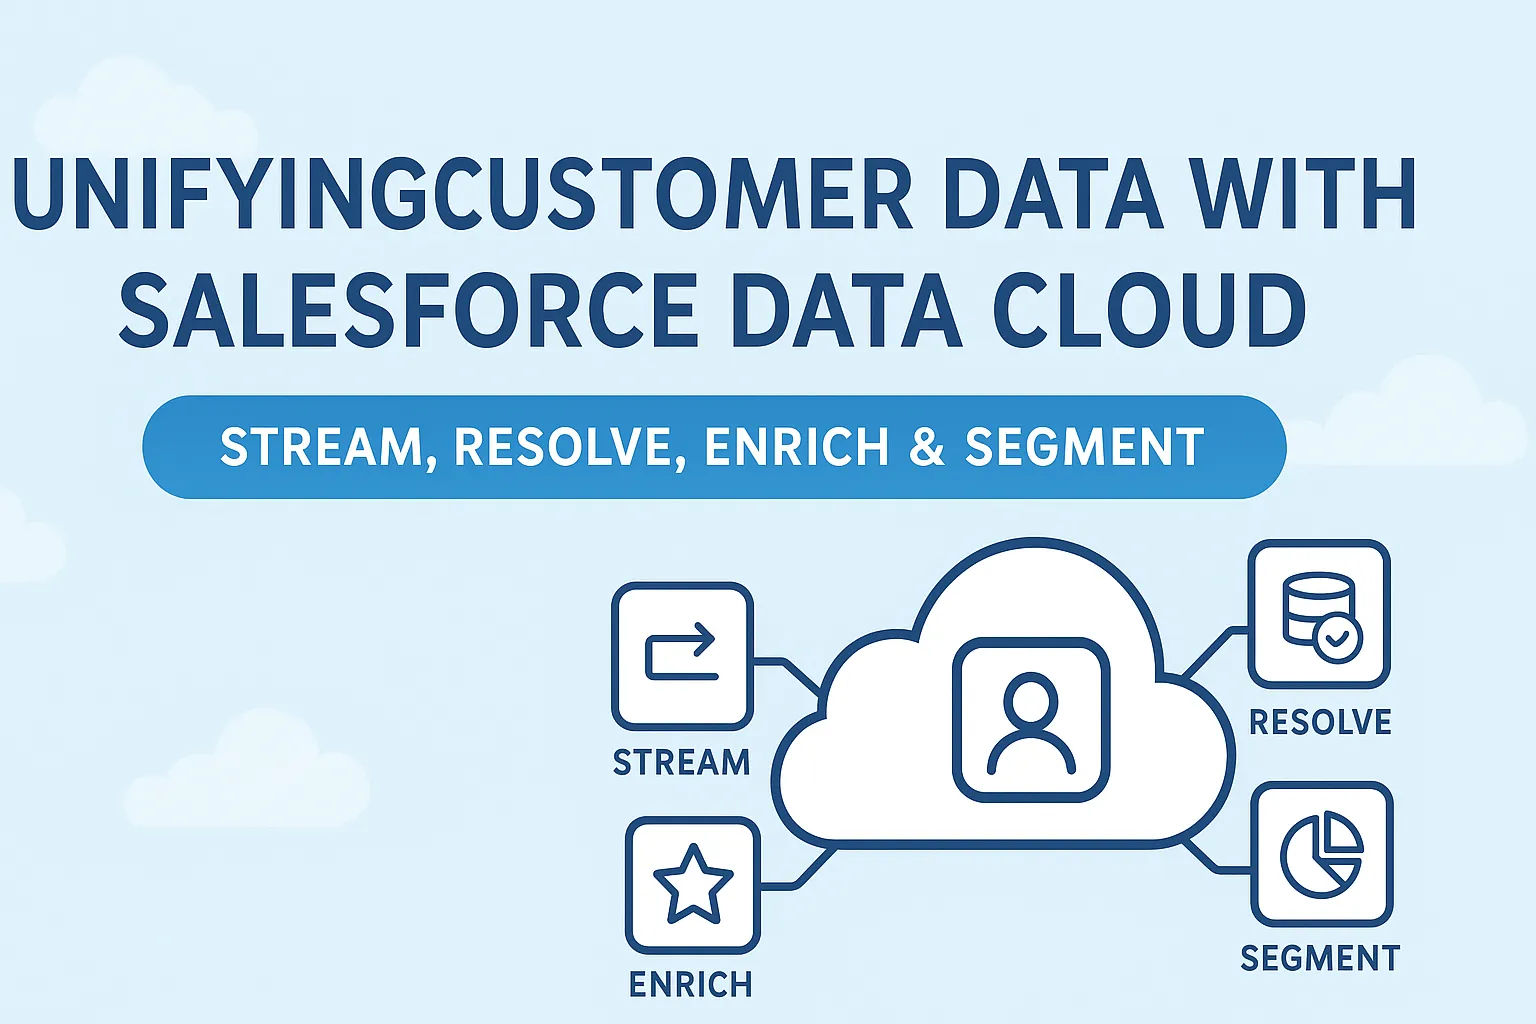
What is Salesforce Data Cloud?
Salesforce Data Cloud is a powerful platform that unifies data from multiple sources, providing a 360-degree view of your customers. Whether you’re in retail, finance, healthcare, or any data-driven industry, Data Cloud helps break down data silos and enables actionable insights at scale.
Creating Data Stream in Data Cloud
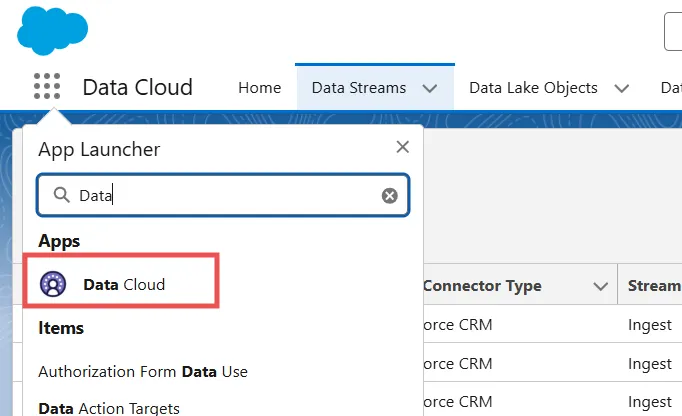
- In salesforce org, Click on App Launcher and Search for Data
- Select Data cloud from the list
- Click on Data streams tab then New button
- Choose Salesforce CRM from the screen
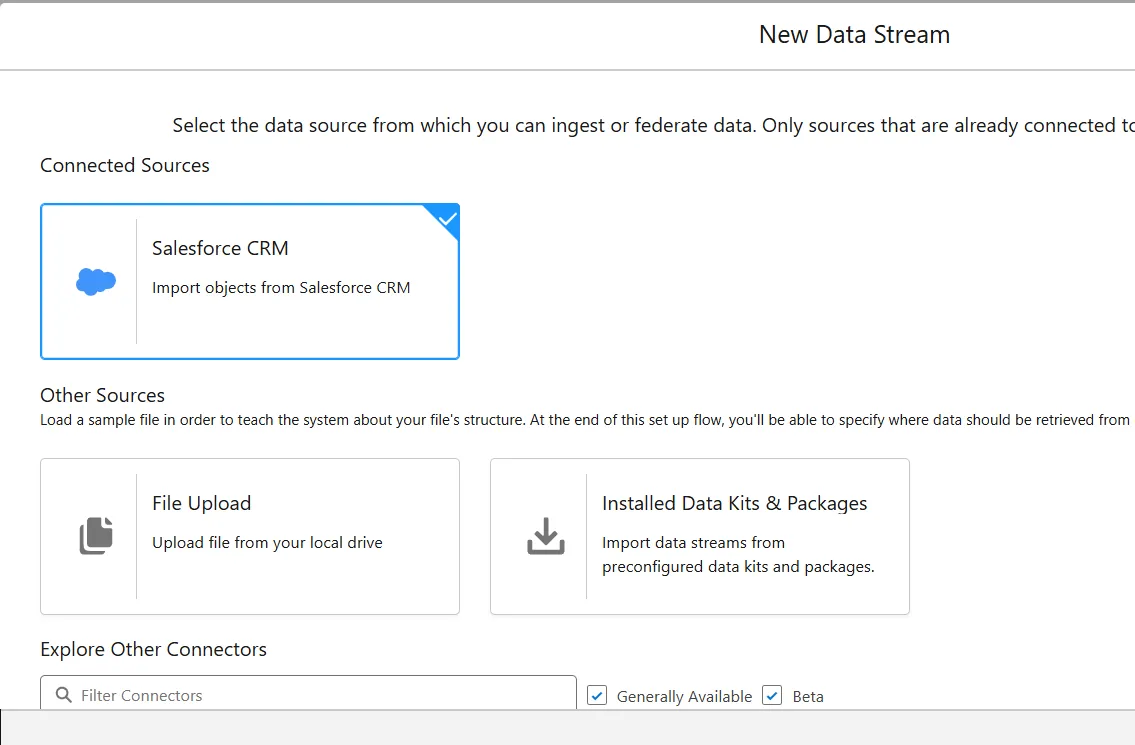
- Click on Next button
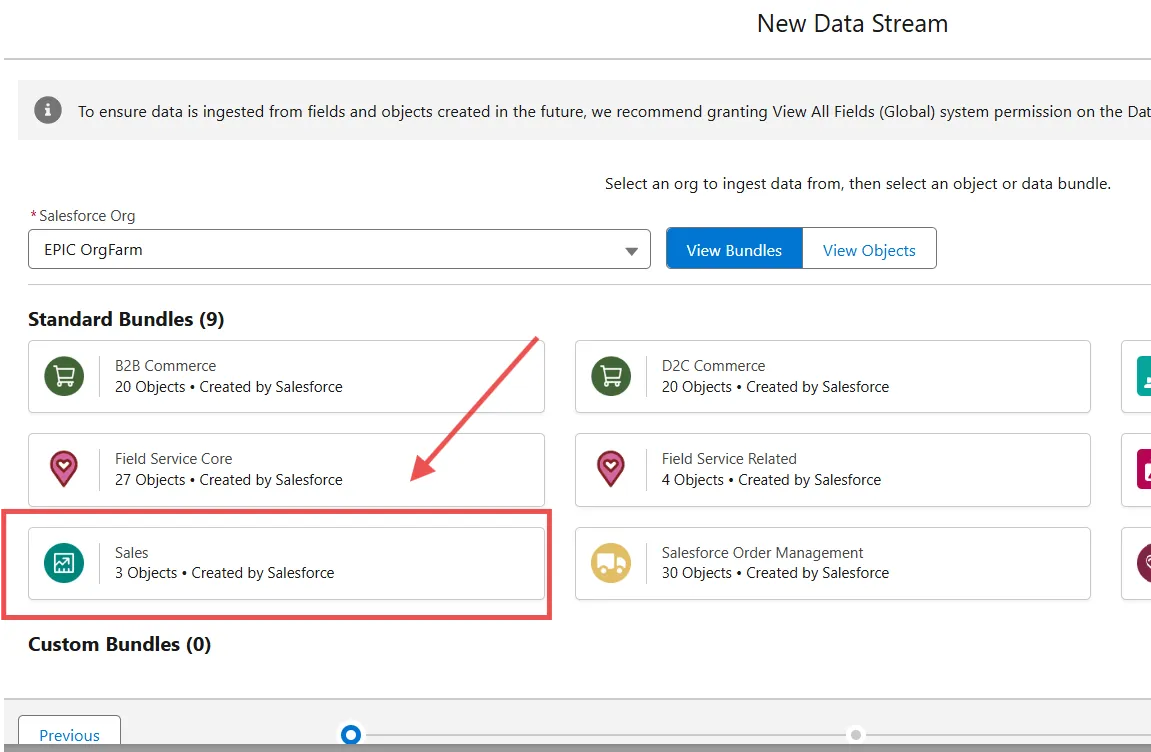
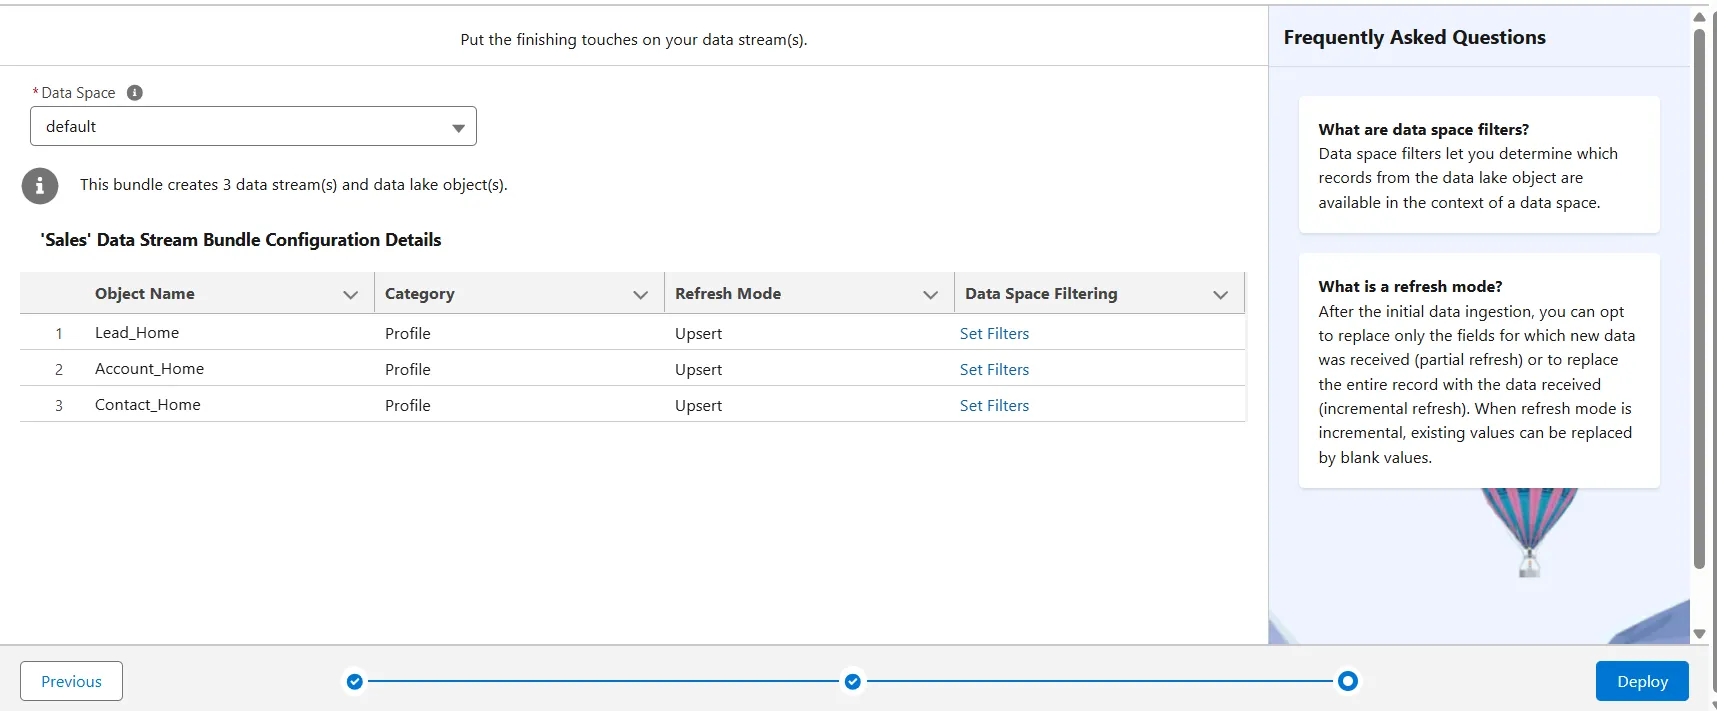
- Choose Sales under Standard Bundles
-
Click on Next
-
Leave values as is, Click on Next
-
Data Space automatically populate with default
-
Click on Deploy
-
Wait until the deployment is complete.
-
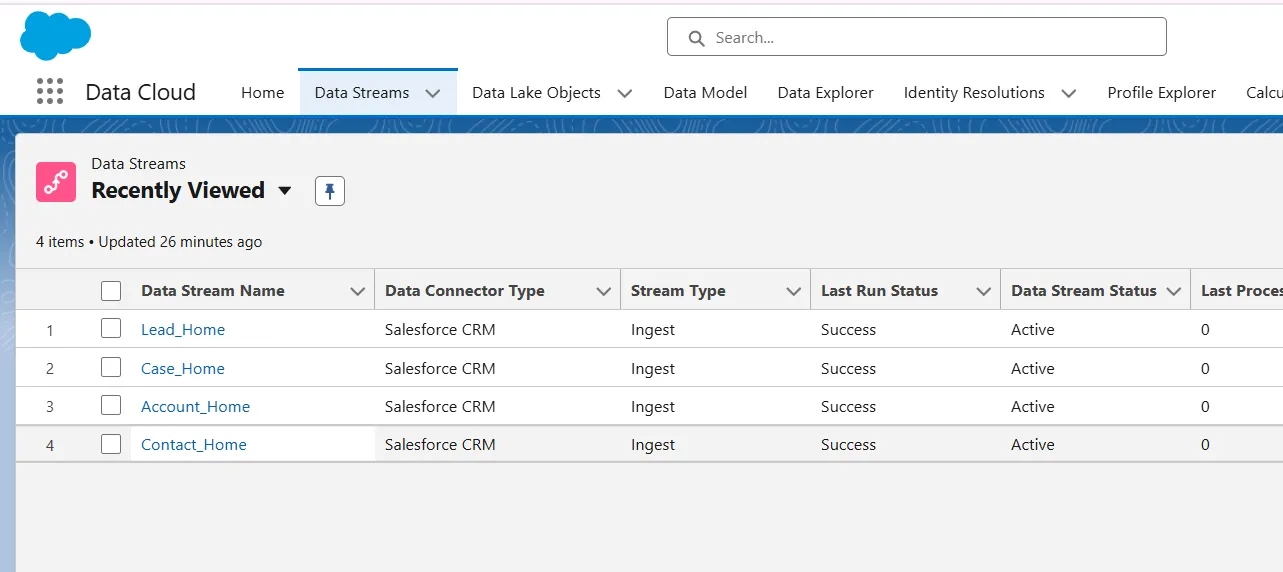
After deployment complete, You will see these records in Data stream tab
Create a Formula Field
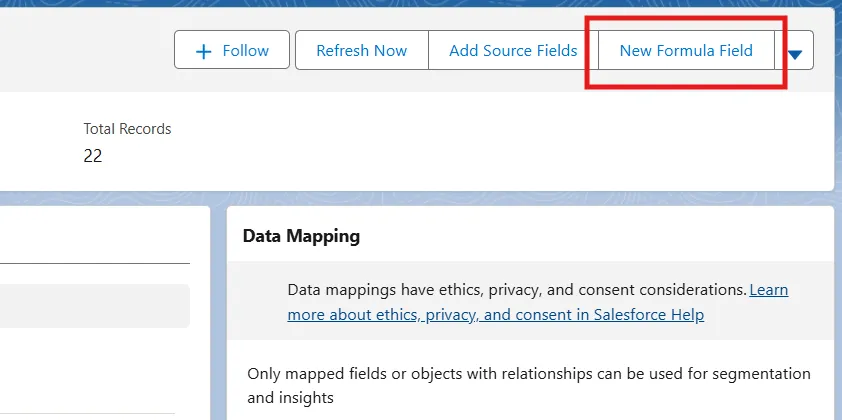
- From the Data Stream tab, locate and click the Lead_Home data stream that you created.
- click the New Formula Field button
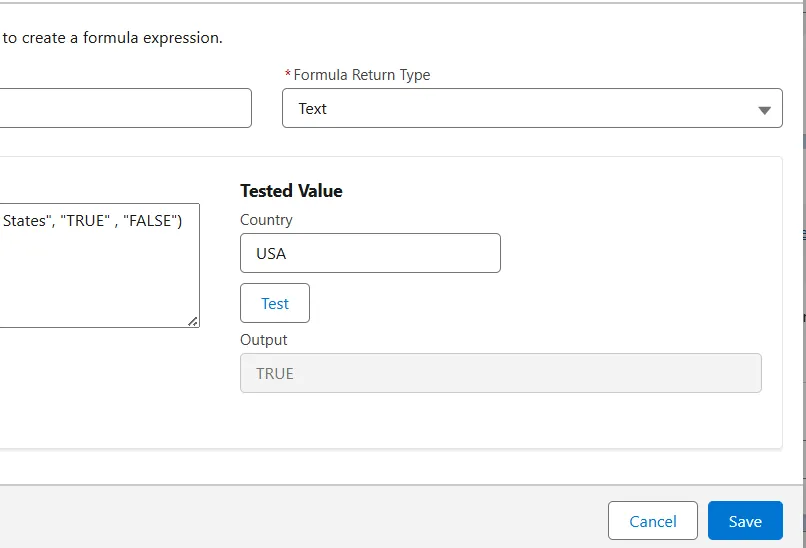
- For Field Label, name your field Is US Based
- For Formula Return Type, select Text
- Enter this formula in the Transformation Formula field:
IF(sourceField['Country'] == "USA" || sourceField['Country'] == "United States", "TRUE" , "FALSE")
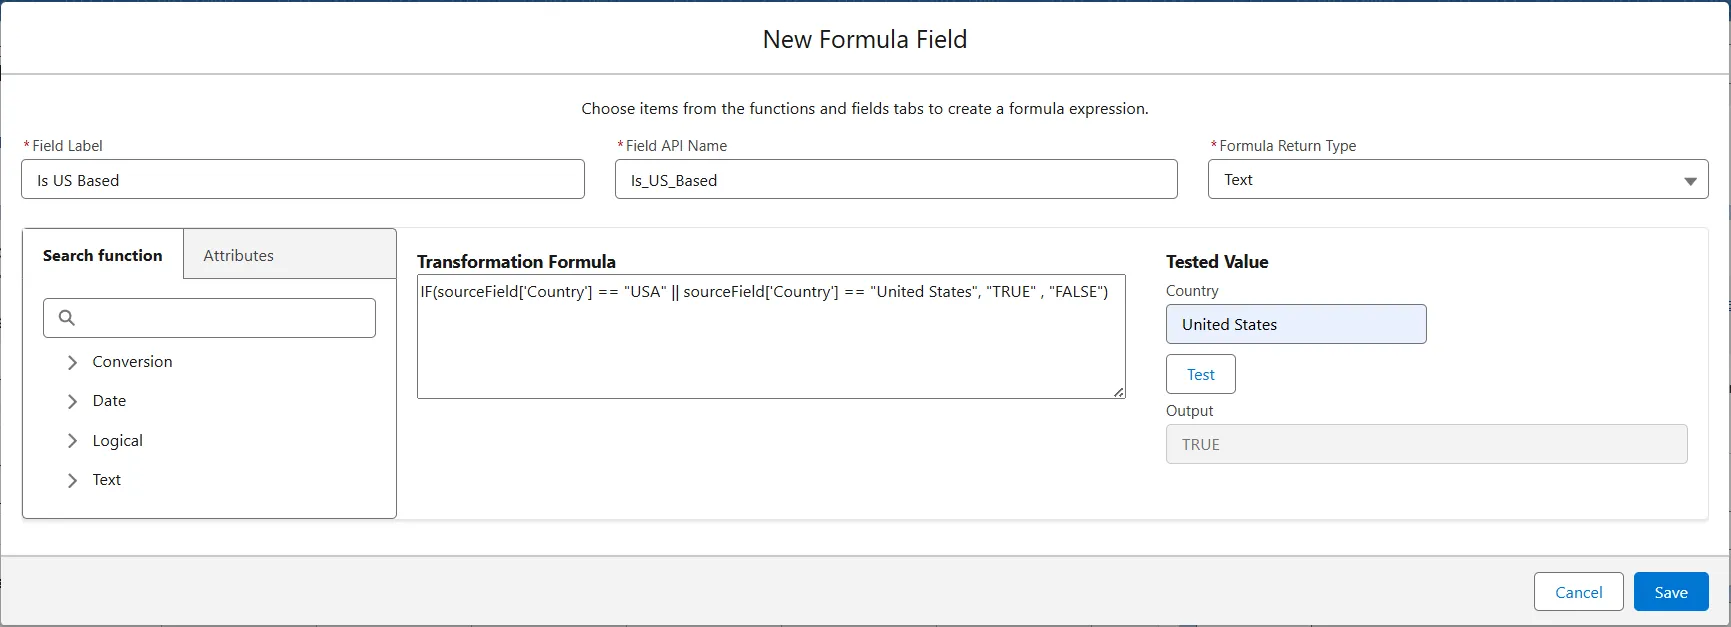
- Validate the formula
- Type
India into the country field and then click Test
- Output should = FALSE
- Type
USA and then click Test
- Output should = TRUE
You are successfully created Data Stream in Data Cloud.
Create an Identity Resolution Ruleset
Unifying customer data through Identity Resolution is a crucial step in transforming scattered data points into meaningful insights. By setting up rulesets in Salesforce Data Cloud, you control how unification happens, ensuring that the most accurate and relevant information makes it into each customer’s unified profile.
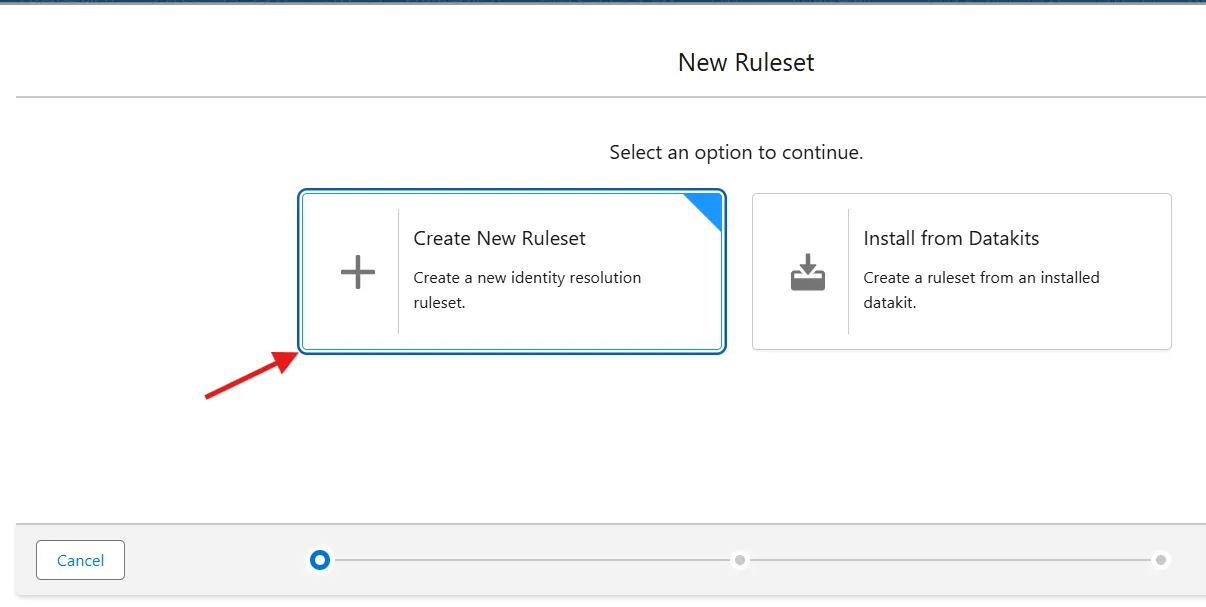
- Search for and select Data Cloud in the App Launcher
- Select the Identity Resolutions tab and click New
- Select Create New Ruleset and click Next.
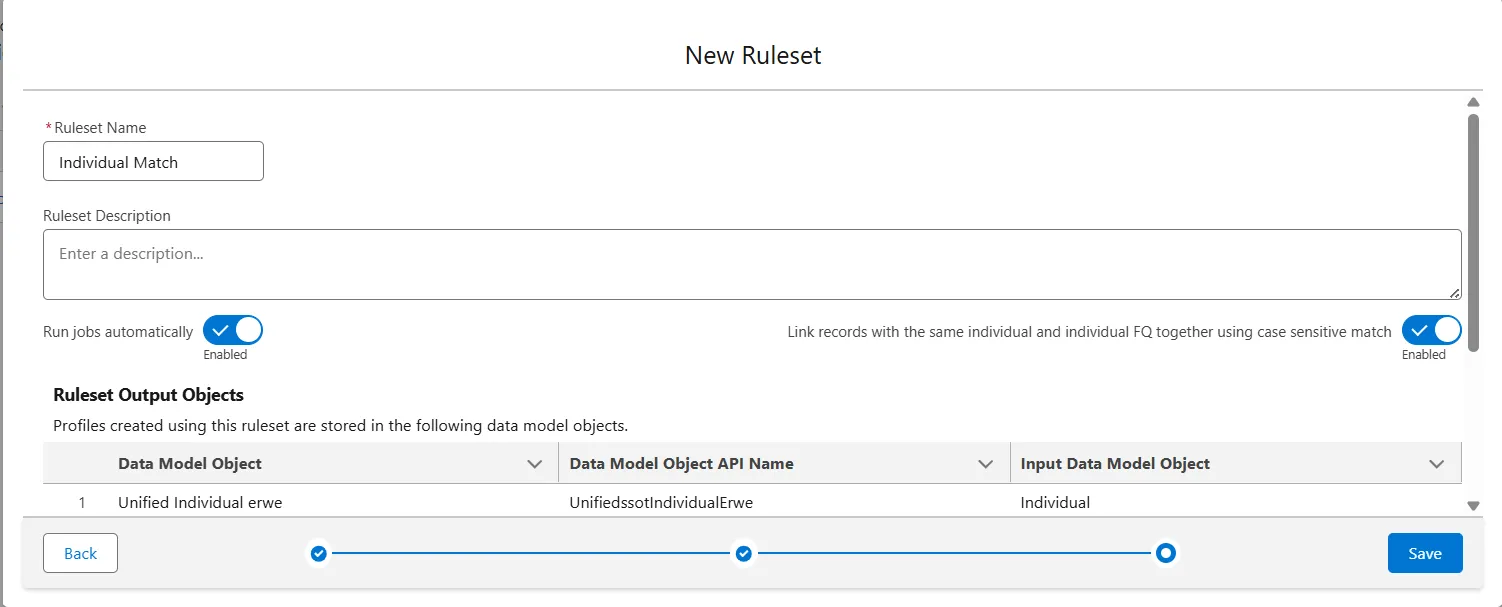
- Choose Individual from the Primary Data Model Object dropdown. Individual is also preselected in the next field
- Leave the Ruleset Id blank and click Next
- In the RuleSet type
Individual Match
- Run jobs Automatically should be Enabled
- Also Link records should be Enabled
Configure
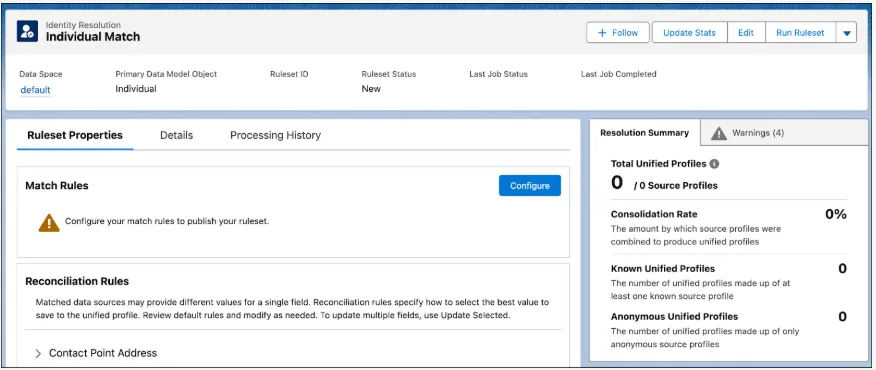
- Open the Identity Resolution record
- Click on Configure button under Ruleset Properties
- Click Next
- Click on Configure button to select your first match rule.
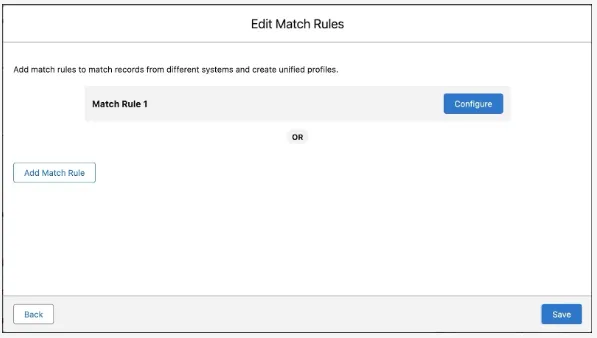
-
Select the Fuzzy Name and Normalized Email and click Next
-
Keep the default settings as is, and click Next
-
To add more rules, click Add Match Rule
-
Repeat the steps to add these other two rules
- Fuzzy Name and Normalized Phone
- Fuzzy Name and Normalized Address
-
Click Save
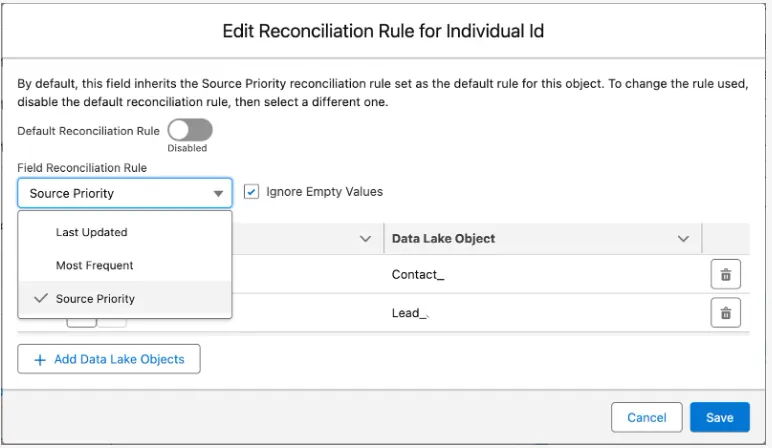
Reconciliation Rule
- Click the Warnings tab on the right side of the page to address the warning about the reconciliation rule for Individual.Individual Id.
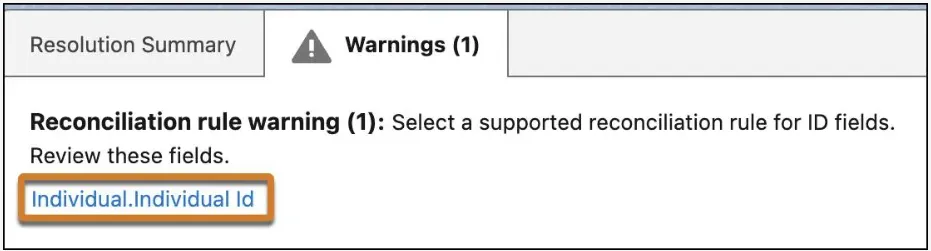
- Click Individual.Individual Id to modify the Reconciliation Rules
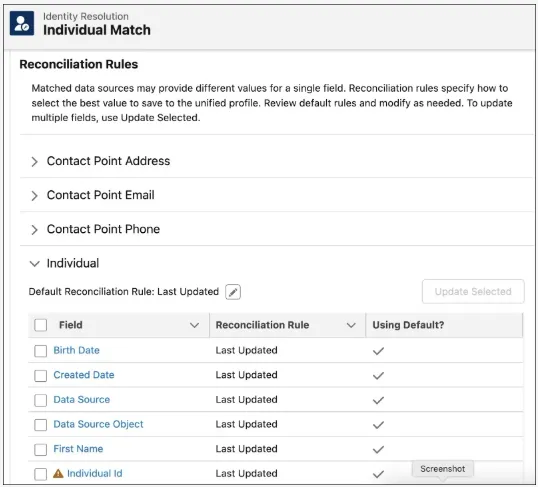
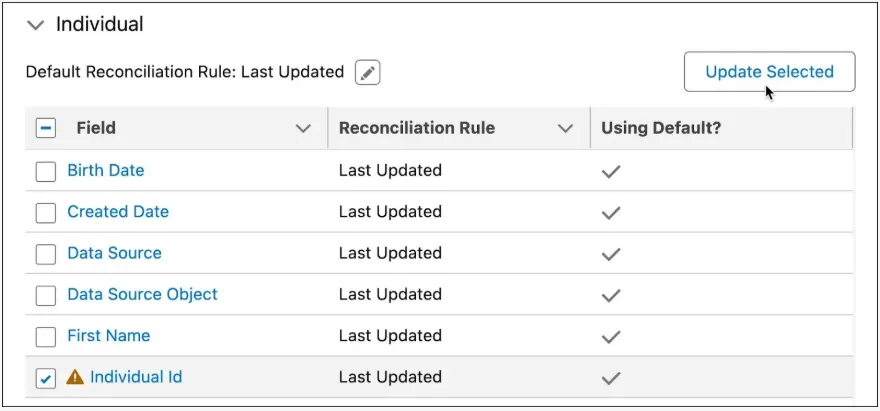
- Select the checkbox next to Individual ID and then click Update Selected
- Disable the Default Reconciliation Rule and then set the Field Reconciliation Rule to Source Priority
Create Calculated Insights
Once you’ve connected, mapped, and unified your data in Salesforce Data Cloud, the next step is to turn that data into actionable intelligence. This is where Insights come in. By querying your unified data, you can generate powerful metrics and analytics that align with your business goals.
- Go to the Calculated Insights tab and click New
- select Create with Visual Builder and click Next
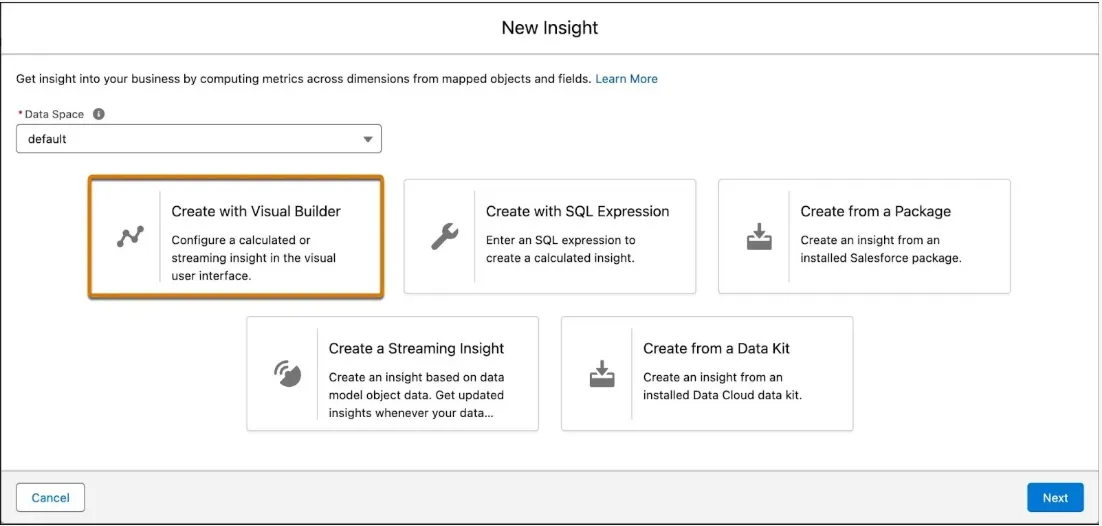
- Select Create a Calculated Insight and click Next
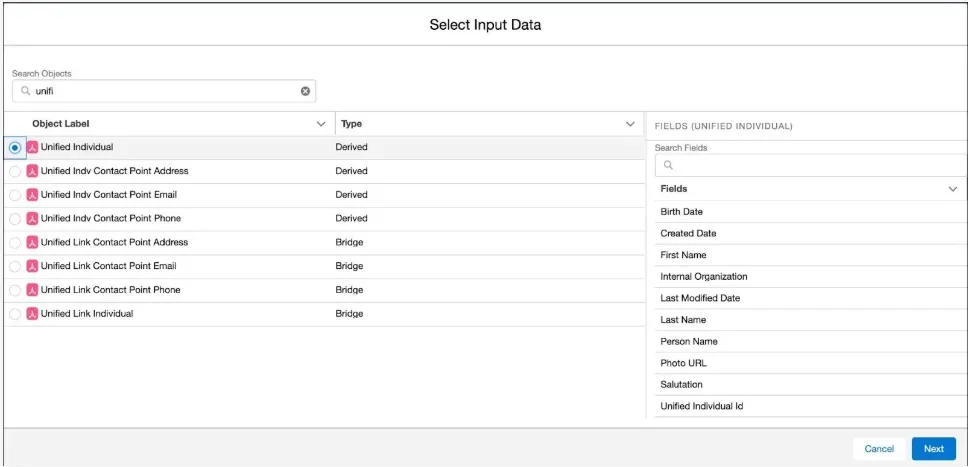
- Search for and then select Unified Individual as your first object in the insight
Free newsletter
Get Salesforce insights delivered weekly
Join 500+ Salesforce professionals and stay ahead of the curve.
No spam. Unsubscribe any time.
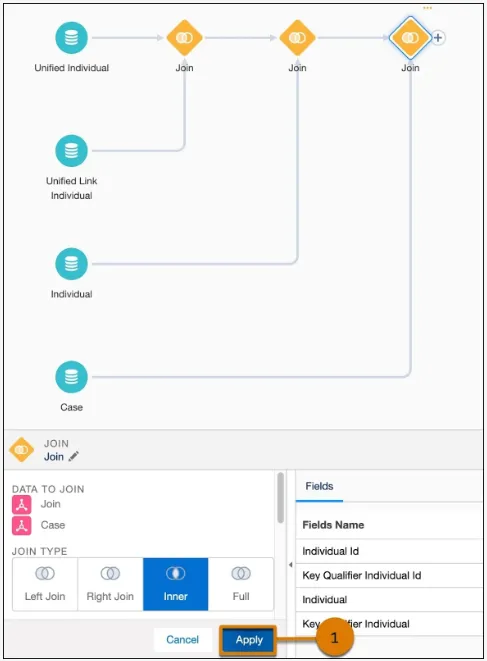
Add a Join
- In the Visual Insights Builder, click the + next to Unified Individual and select Join
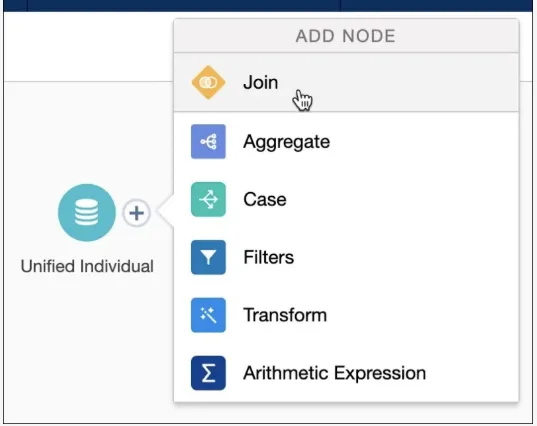
- Select Case and then click Next
- Notice that this automatically adds and joins multiple objects to create a proper join from Unified Individual to Case.
- Click Apply (1) to verify your selection.
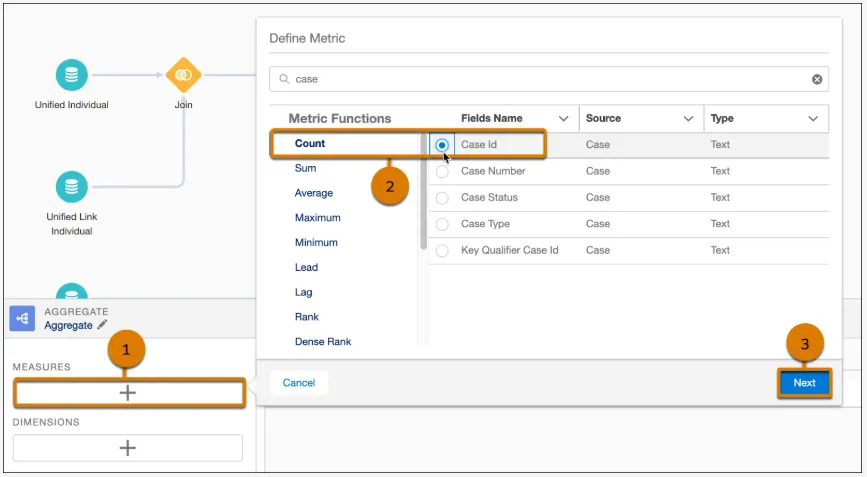
Add an Aggregate
- Click the + on the last Join and select Aggregate
- For Measures, click + (1). From the Count section, select Case Id (2)
- Tip: Use the search field to locate Case Id easily
- Click Next (3)
- For Metric Name enter
Count Case ID. Notice Metric API Name automatically populates with Count_Case_ID
- Click Apply
Add Dimensions
- For Dimensions, click + (under the Measures +) and add Unified Individual Id from the source, Unified Individual.
- Click Next
- For Dimension Name enter
Unified Individual
- Click Apply
- Follow these steps to add Case Status named Case Status as a dimension
- Click Apply for the Aggregate selections
Save Your Work
- Select Save and Run
- Name your calculated insight
Unified Individual Case Counts and click Next
- Leave the schedule to the default,
Not Scheduled, and click Enable
- On the Calculated Insights tab, click
Publish Now from the dropdown menu
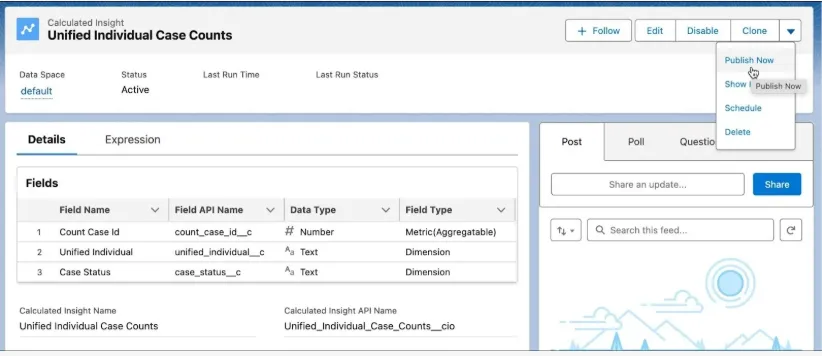
If you don’t see Publish Now, refresh your browser and try again.
Create a Segment
Before diving in, it’s important to understand why Segmentation and Activation are so valuable. When you have access to a large amount of customer data, the challenge is figuring out how to focus on the right group. This project walks you through creating a segment filter in Data Cloud, helping you identify, target, and connect with the customers that matter most, quickly and effectively.
- From your Developer org, search for Data Cloud in the App Launcher
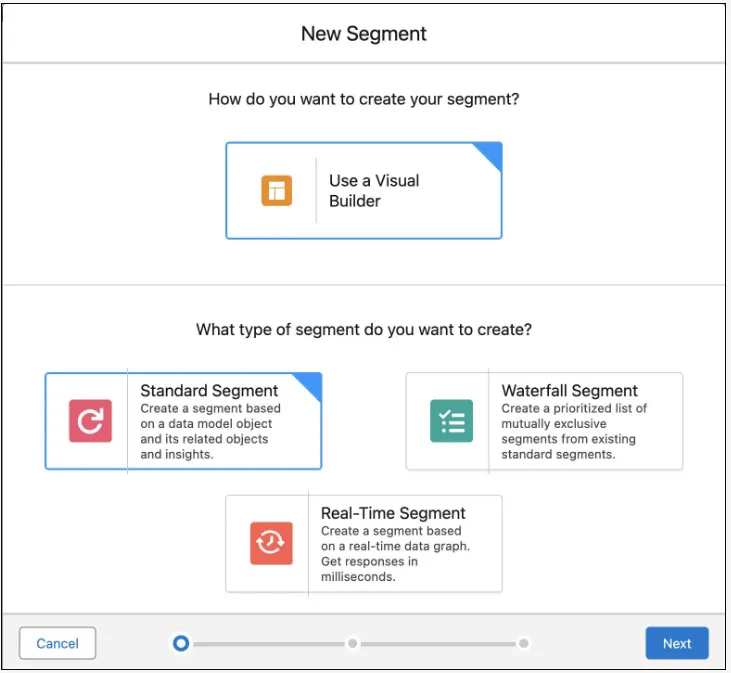
- From Data Cloud, go to the Segments tab and click New
- Leave Use a Visual Builder and Standard Segment selected and click Next
- The default Data Space should be auto-selected. Then from the Segment On dropdown, select Unified Individual.
- Next, name your segment No Zip Code. Add an optional description to describe your segment
- Click Next
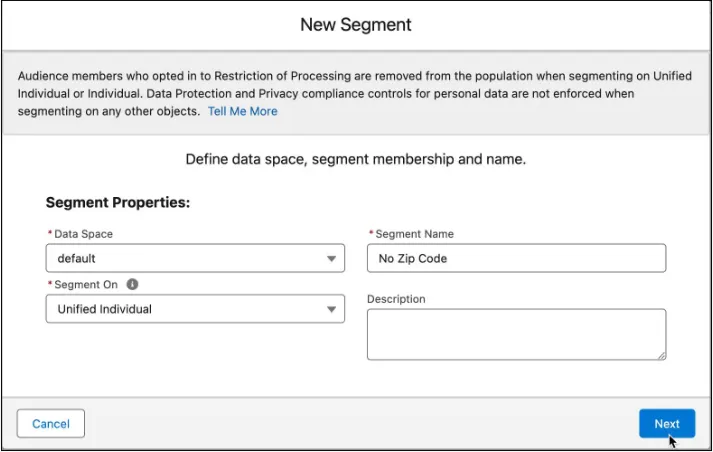
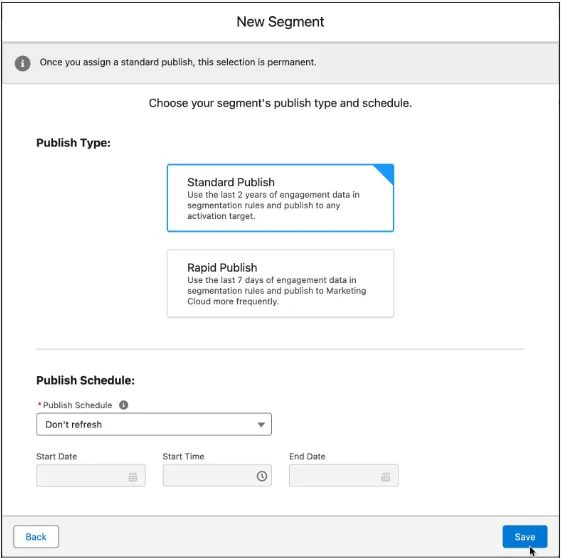
- Select Standard Publish
- From the Publish Schedule dropdown, select Don’t refresh and click Save
Add Filters
The goal of this segment is to narrow down the list of US Based leads who haven’t provided their zip code. Follow these steps to add filters to obtain this result.
- With the Attributes pane selected, expand Related Attributes
- Search for
Is US Based under Lead
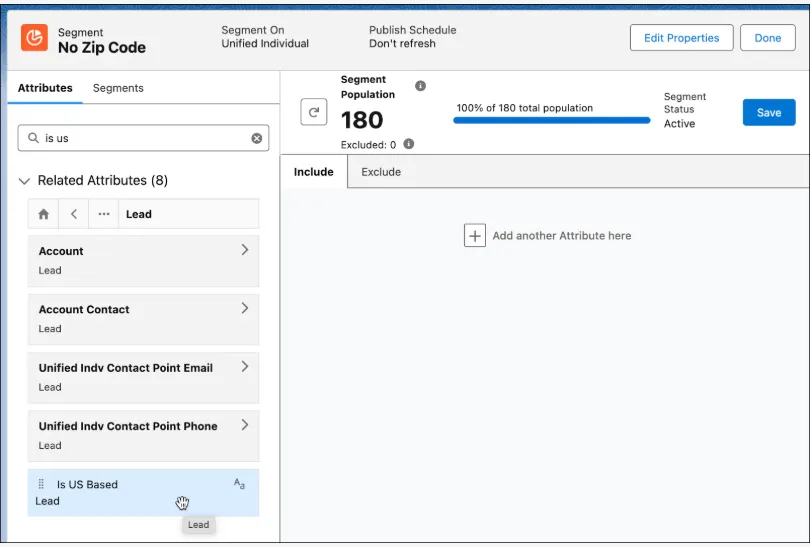
-
Select the first option and then drag the Is US Based attribute to the canvas
-
Within the Lead container
- From the Measurement dropdown, select Count
- From the Operator dropdown, select At Least
- For Value, type
1
-
For the Is US Based attribute:
- From the Operator dropdown, select
Is Equal To
- For Value, type
true (and select from available options)
-
Click Done

-
Next, search for Postal Code under the Related Attribute Lead and then drag the Postal Code attribute to the canvas
-
For the Postal Code attribute:
- From the Measurement dropdown, select Count
- From the Operator dropdown, select At Least
- For Value, type
1
-
From the next Operator dropdown, select Has No Value
-
Click Done
-
Click Save
-
When the number is refreshed, click Done
Activate a Segment
Once you’ve built a segment in Data Cloud, the next step is to put it to work, that’s where Activation comes in. Activation is the process of sending your segment to the platforms where you’ll actually use it, like marketing tools or advertising channels.
To make this happen, you connect your segment to an activation target. Think of it as the bridge that securely stores the authentication and authorization details for each platform. These targets can include Marketing Cloud, Data Cloud, B2C Commerce, Amazon Ads, Google Audience Insights, and many more.
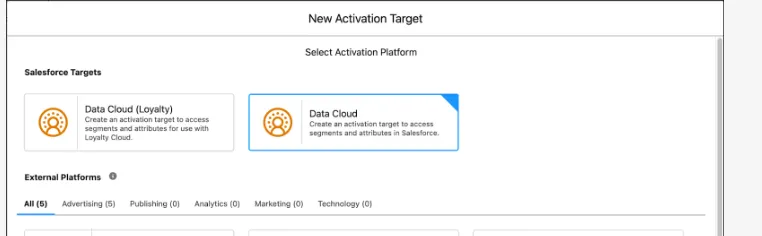
Create a New Activation Target
- Navigate Activation Targets tab.
- Click New
- Select Data Cloud and click Next
- Name your Activation Target
Data Cloud Segments. Add an optional description
- Select default for your Data Space
- Click Save
Activate Your Segment
-
Navigate to the Activations tab
-
Click New
-
For Segment, select the newly created No Zip Code segment
-
Select Data Cloud Segments as your Activation Target
-
For Activation Membership, select Unified Individual
-
Click Continue
-
Next to Email, click + Select and then Next
-
Click Add Attributes
-
From Direct Attributes under Unified Individual, drag Last Name under the Unified Individual section on the right, next to the existing Unified Individual Id.
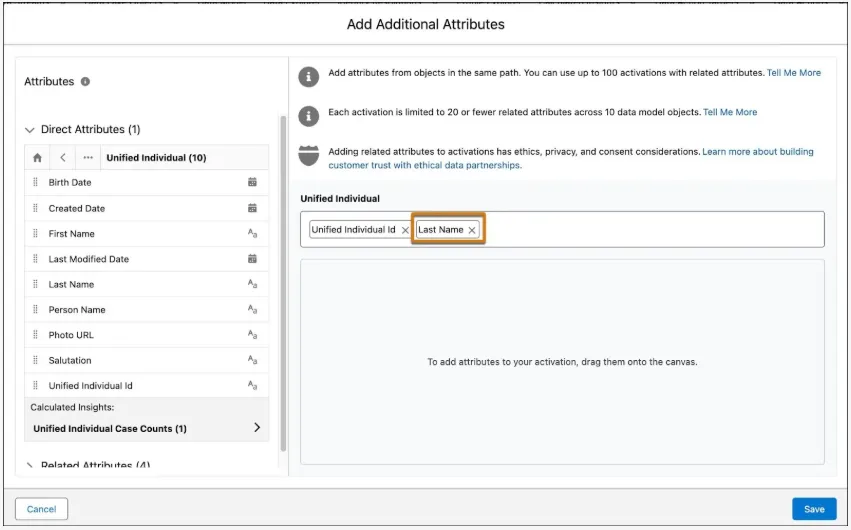
- Click Save
- Review the summary and then click Next
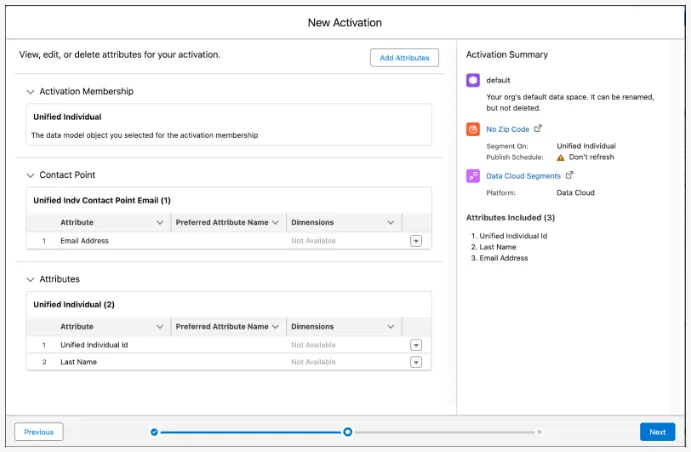
- Name the activation No Zip Code
- Confirm the Incremental Refresh is selected and then click Save
Conclusion:
By creating Data Streams, Identity Resolution rules, Calculated Insights, and Segments in Data Cloud, you have successfully established a complete data foundation, from ingesting and unifying data to deriving insights and targeting specific audiences. This end-to-end setup enables smarter decision-making, personalized engagement, and more effective business strategies.
Related Articles
Ready to implement? Learn more about our Salesforce Data Cloud & Integration.