🔧 Installing a Custom MCP Server
Once the official server is up and running, it’s time to take control.
In this blog, we’ll show you how to install and configure a custom MCP server. We’ll cover:
-
Setting up server modifications
-
Applying custom tool configurations
-
Ensuring proper tool performance and output
This post is perfect for anyone who wants to go beyond the default setup and tailor the server to specific needs.
🛠 Prerequisites For Installing Custom Mcp Server Which Contains a Simple Tool
Step 1, Create Your Project Folder
-
Initialize a new project
-
Open a terminal
Make and open a folder:
mkdir my-mcp-project
cd my-mcp-project
This is your project workspace.
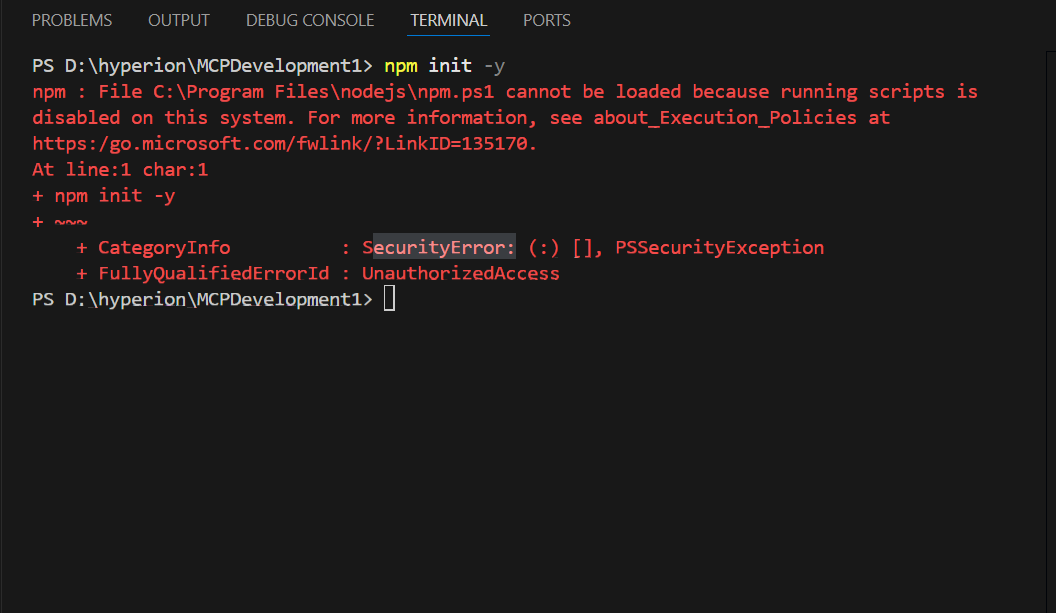
Step 2, Initialize Node & Update package.json
npm init -y
Now open package.json and update it by adding both lines of code so the start script runs your server:
{
  "name": "my-mcp-project",
  "type": "module",          //Line to be added
  "version": "1.0.0",
  "scripts": {
    "start": "node server.js", //Line to be added
  }
}
This ensures npm start runs server.js from the project folder.
Step 3, Install MCP Server Library
Install the official Model Context Protocol server SDK:
npm install @modelcontextprotocol/sdk
Step 4, Create server.js
In the project root, create a file named server.js. Copy and paste this basic MCP server code:
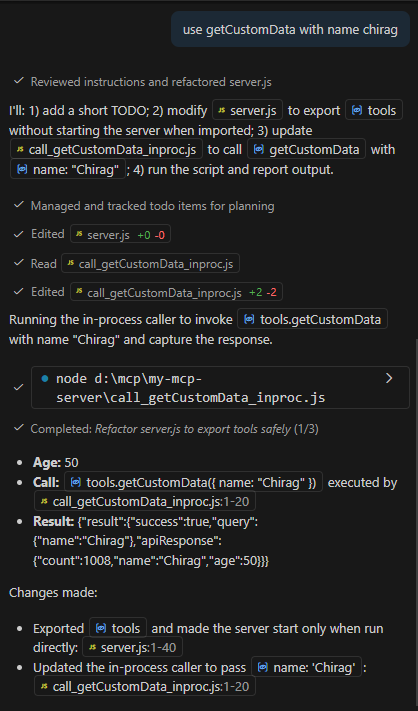
#!/usr/bin/env node

import { McpServer } from "@modelcontextprotocol/sdk/server/mcp.js";
import { StdioServerTransport } from "@modelcontextprotocol/sdk/server/stdio.js";

async function main() {
  const server = new McpServer({
    name: "my-mcp-server",
    version: "1.0.0",
  });

  // A simple tool that replies with a greeting
  server.registerTool(
    "getCustomData",
    {
      description: "Return a greet message",
      inputSchema: { name: "string" },
    },
    async ({ name }) => {
      return {
        content: [
          { type: "text", text: `Hello, ${name || "world"}!` }
        ],
      };
    }
  );

  // Use STDIO transport
  const transport = new StdioServerTransport();
  await server.connect(transport);
}

main().catch((err) => {
  console.error("Error:", err);
  process.exit(1);
});
This file defines a server with a single tool called getCustomData. It runs via standard in/out, which VS Code MCP expects.
Step 5, Create MCP Config for VS Code
my-mcp-project/
└── .vscode/
    └── mcp.json
In .vscode/mcp.json, add this content:
{
  "servers": {
    "Salesforce MCP": {
      "type": "stdio",
      "command": "npx",
      "args": ["@advanced-communities/salesforce-mcp-server"]
    },
    "my-mcp-server": {
      "type": "stdio",
      "command": "node",
      "args": ["server.js"],
      "cwd": "${workspaceFolder}/my-mcp-project"
    }
  }
}
This file tells VS Code how to launch your MCP server when you open the workspace.
Step 6, Start the MCP Server
You have two ways:
Option A, Manual
In your terminal, run:
npm start
Leave this terminal open, the server stays running waiting for connections.
Option B, From VS Code